Ruffle Leather Jacket - in progress
So, I have decided that I need to sew another leather jacket. Pattern Review is having a Natural Fibres contest and that is serving as motivation for me to actually cut into my leather that I have had stashed since last year's leather sale at Fabric Mart.
After searching the web for hours for inspiration, and trying out a wide variety of trims such as lace, zipper tape, metal chain and a variety of adhesive studs and bling, I settled on a ruffle design. But not without much trepidation, that's for sure.
It seems that my hesitation was warranted. I have discovered that there is a reason that there are few, if any, patterns for jackets with ruffle trim of leather. I have also discovered that any such jackets available in RTW are in the $500-$1000 range and up. Sewing leather ruffles in NOT easy.
The reason that I settled on ruffles is that I didn't want it to look too "biker" because I want to wear it to work and dressier venues. A little bit girly and a little bit tough, I guess, was what I was going for. For me, casual wear is paddling and outdoor quick dry clothing. Leather jacket = dressier attire in my world (small town, small island, where dressing up means wearing your best black running shoes and your cleanest ball cap).
First of all, you don't want too many basting threads to ruffle the leather due to the fact that holes will be left behind. Secondly, when you sew leather ruffles to other leather, it makes for a whole lot of layers of leather for your sewing machine to get through (yay, Bernina 550, I love you!).

The pattern is McCalls 6171, with the 3/4 sleeve length. I added ruffles along the front yoke seam.

Here the sleeves are ready to have the seam allowances glued in place. I use contact cement (outdoors so the fumes don't poison us all) to glue any seams that I don't topstitch, such as the sleeve seams and the side seams.

The binder clips in the image are my #1 favourite tool for sewing leather. The small size can be clipped onto seam allowances and allow you to leave them in place as you sew, with enough room for the presser foot to stitch the seam. I used about 10 clips on the armscyes when I set in the sleeves and they went in without a hitch. (plus I had already trimmed all the excess ease from them when I first made a muslin of this pattern.
In the 3 years that I have been sewing, this is definitely my most challenging project to date. However, I have been enjoying the challenge and the sense of euphoria of being able to do it!
I began cutting out my leather Saturday morning, went for a ten km run, played with the kids and gardened the rest of the day, then sewed Saturday evening for a few hours. This morning I set in the sleeves and completed the ruffles around the zipper and collar, and even got the zipper in without a hitch.
Some notes for myself:
Size 90 needle
seam stitch length 3.0, topstitching length 3.5
leather ruffles.....been there, done that, never again
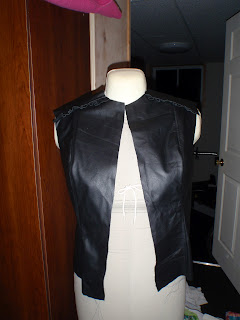
Here is a quick snap...to lazy to put it on the dressform so it basically looks like a blob of leather.

Next Steps: the lining! More to come.


Leather again! You're ambitious. This is looking really good so far.
ReplyDeleteHoly Cow, I'm so impressed with anybody who sews leather garments. This jacket is going to be beautiful! I love the ruffles details!
ReplyDelete